AFL Finals - bepoz Public Holiday Surcharge Setup Guide


As the excitement builds for the AFL Grand Final and the public holiday that accompanies it, it's essential for hospitality operators using bepoz to be well-prepared. With the game scheduled for a Friday and a public holiday, venues are expected to be bustling with patrons. Ensuring that your surcharges are correctly set up is crucial for a smooth operation during this busy weekend and will help ensure you are not left out of pocket covering increased wages for the day. In this guide, we'll walk you through the steps to set up your bepoz Public Holiday surcharges, making your venue holiday ready.
1. Setting Up Public Holiday Surcharges with bepoz (Version 4.6 and Below)
bepoz offers flexibility when it comes to accommodating membership pricing, applying surcharges partially, and allowing both automated and manual application. Here are the steps to set up your public holiday surcharges:
1.1 Set Up Price Numbers
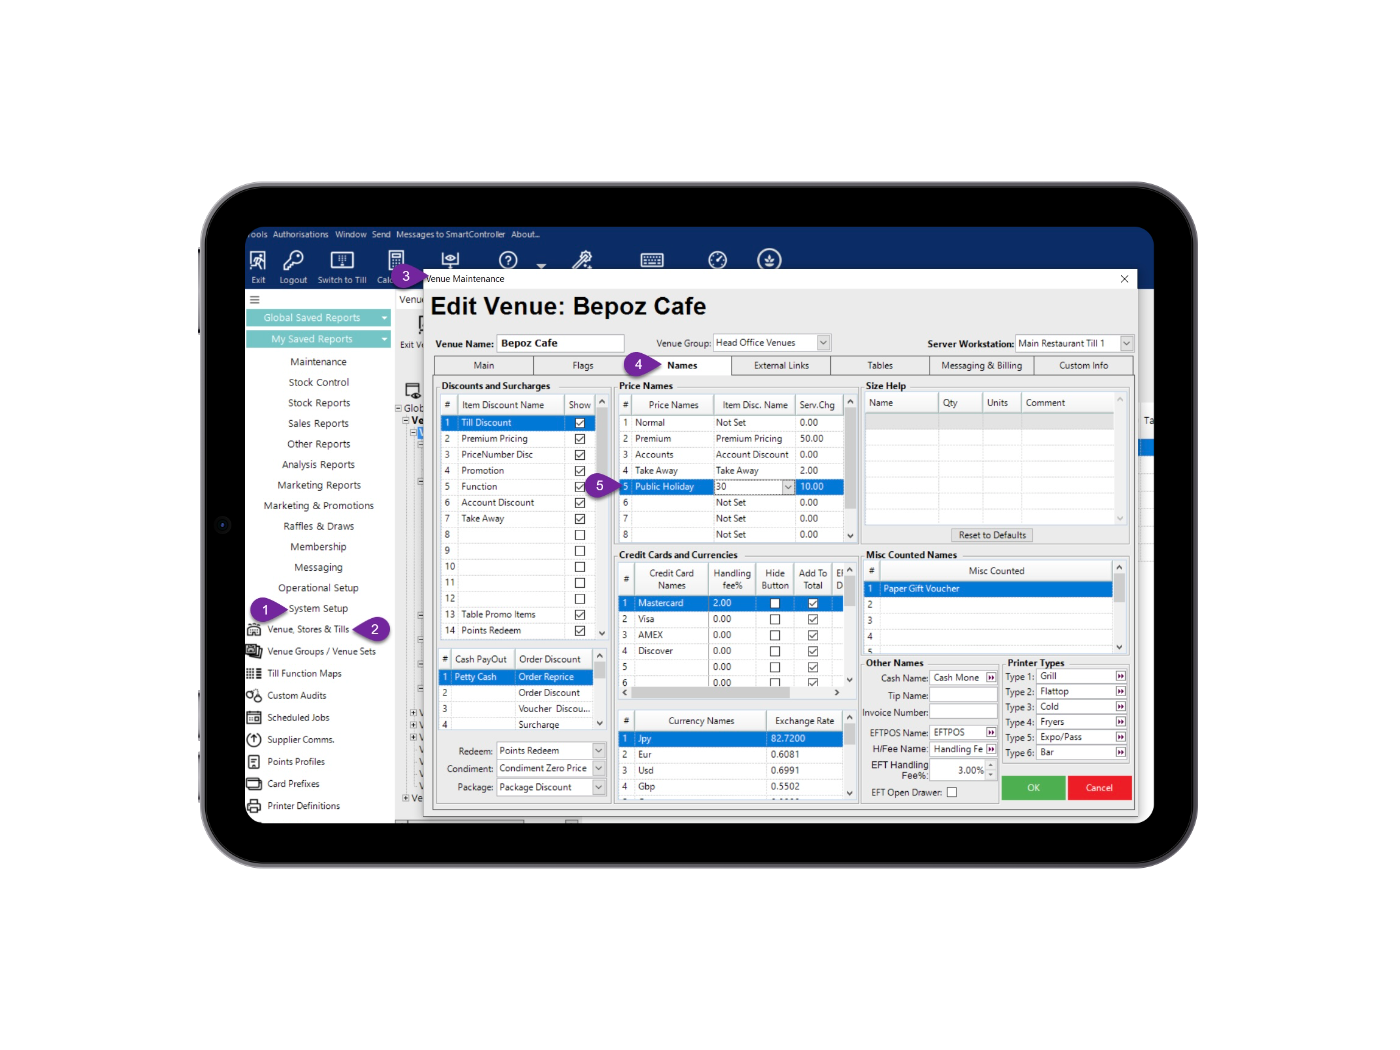
- Navigate to System Setup.
- Go to Venue, Stores & Tills.
- Edit Venue Settings*.
- Navigate to the Names tab.
- Set Price Names for Public Holiday (and/or Weekend or Sunday, etc.)
Note: You can also set a Discount Totalizer if you have set one up in Discounts and Surcharges, but this is not necessary. An example might be "Service Surcharges". - Select "OK" to save and close the Edit Venue dialogue box.
- Repeat the procedure for each venue in a group for Multi-Venue customers.
1.2 Set Up Product Pricing
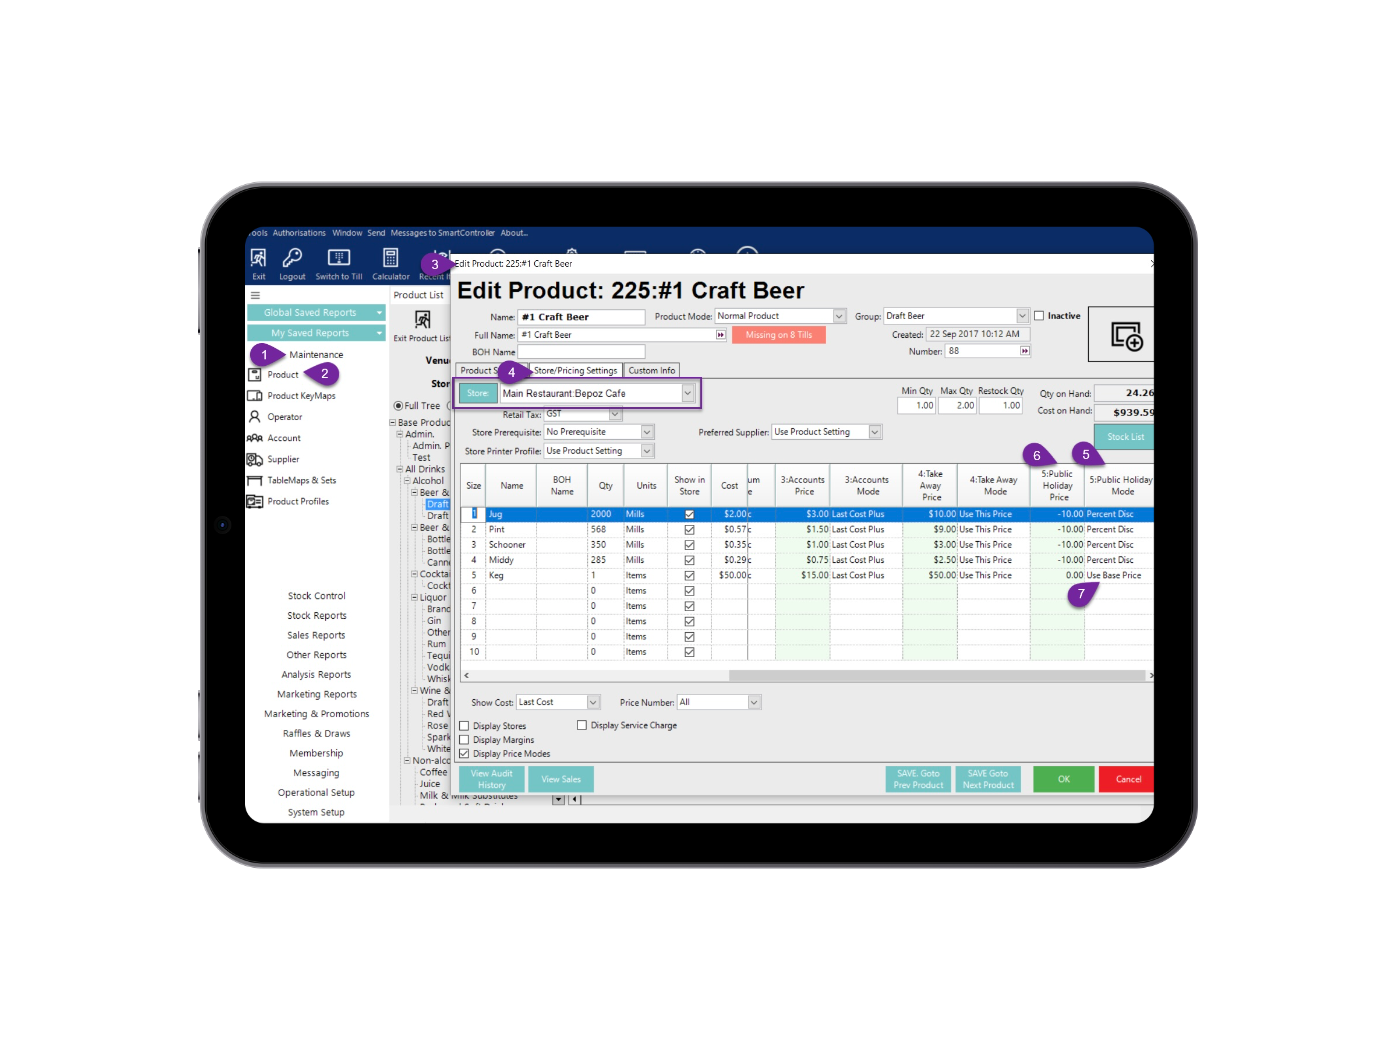
Note: For venues with multiple stores, these steps will need to be repeated for each store where the pricing needs to be updated.
- Navigate to Maintenance.
- Go to Product.
- Edit any Product.
Note: Product Pricing can only be set at the product level, NOT the product group. - Navigate to the Store / Pricing Settings tab.
- For each Size, go to the Public Holiday Mode and choose Percent Disc from the drop-down menu.
- Enter a surcharge percentage of the base price (Price Number 1).
- Positive numbers are a discount, negative are a surcharge.
- A Dollar sign is always prevalent even though this will be a percentage. For example, -$5.00 will represent a 5% surcharge. - Choose Use Base Price for any products that should NOT have surcharges applied to them.
- Do not try to use 0% (i.e., $0.00) as this can cause multiplier problems in other areas of the software. - Select "OK" to save and close the Edit Product dialogue box.
Repeat the procedure for each venue in a Product that needs to be affected by Public Holiday or Weekend surcharges, etc.
Note: Each product may have 3 or more Price Numbers, allowing for flexible application of surcharges.
1.3 Set Up Pricing Schedules
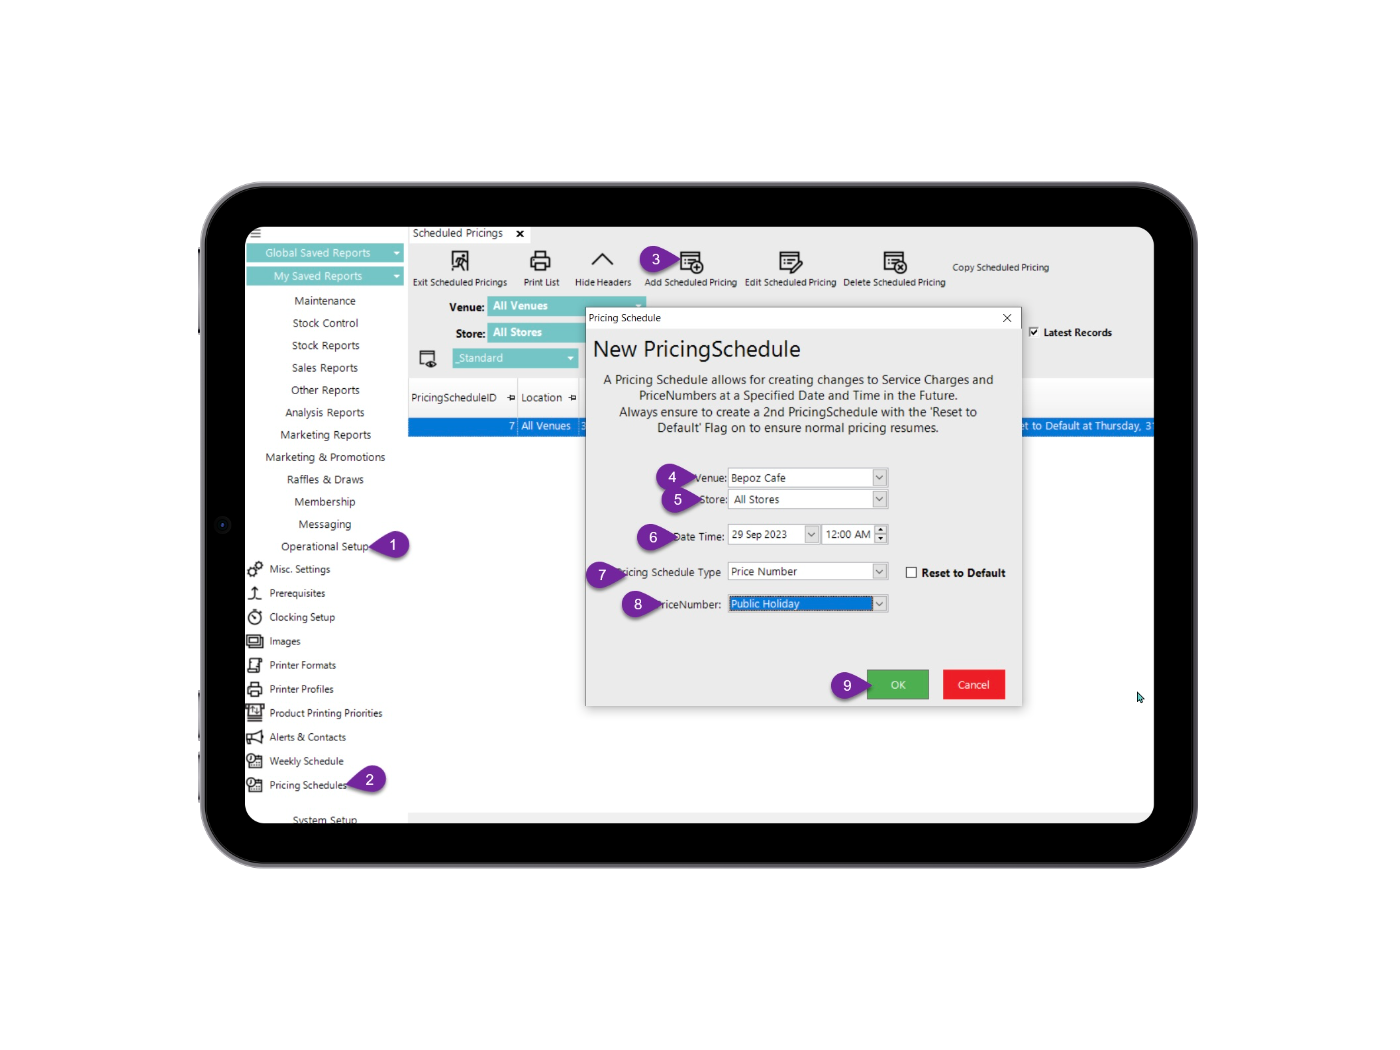
Now that you have multiple Price Numbers set for all products, you can automate the switch between Standard and Public Holiday pricing. Follow these steps:
- Navigate to Operational Setup.
- Go to Pricing Schedules.
- Select Add Scheduled Pricing from the top menu.
- A New Pricing Schedule dialogue box should appear. - Select the Venue to schedule, or leave it on All Venues.
- (See note above regarding State-based Public Holidays) - Select the Stores to run surcharges on, or leave it on All Stores.
- Choose the Date and Time to initiate surcharges.
- Set the Pricing Schedule Type to Price Number.
Note: Setting to Service Charge and applying a % surcharge is a blanket approach to the Standard Price Number and will not facilitate member pricing, etc. - Choose the Price Number to set (e.g., Public Holiday).
- Select "OK" to save and close the New Pricing Schedule dialogue box.
- Create a new schedule with the same settings but set the date to a future date when the holiday is over (select the Reset to Default checkbox). This will stop the surcharge and return to Standard pricing. Repeat the procedure for each Public Holiday to be set.
2. Set Up Weekly Schedules
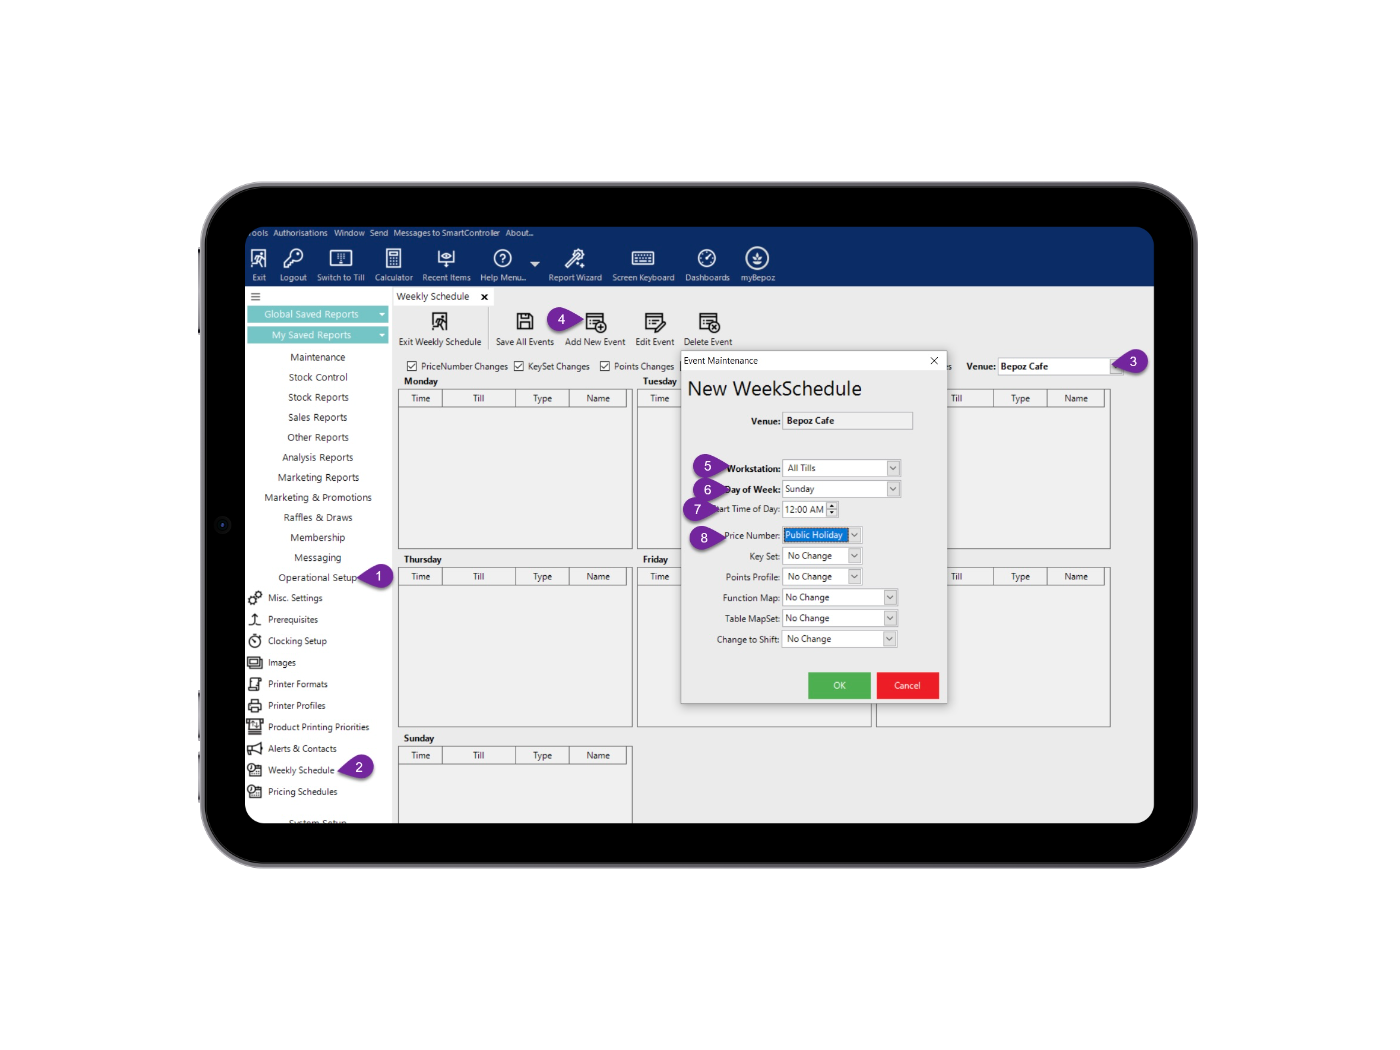
You can also automate the switch between Standard and Public Holiday pricing on a weekly basis. This is particularly useful for regular surcharges like Sundays. Follow these steps:
- Navigate to Operational Setup.
- Go to Weekly Schedules.
- Select a Venue from the Venue drop-down menu.
- Select Add New Event from the top menu.
- A New Week Schedule dialogue box should appear. - Set the Workstation to All Tills.
- Select the Day of the Week to schedule (e.g., Sunday).
- Choose the Time to initiate surcharges.
- Set the Price Number to Weekend.
- Leave all other settings as they are.
- Select "OK" to save and close the New Week Schedule dialogue box.
- Create a new schedule with the same settings but on the following day (e.g., Monday) and set the Price Number back to Standard (Price Number 1). This will stop the surcharge and return to Standard pricing.
Repeat the procedure for each Venue in a Multi-Venue group.
3. Set Up Product KeyMaps (and Jobs)
For ultimate control over pricing modes, provide your venue staff with the ability to manually switch between Standard and Public Holiday or Weekend pricing using Product Keys. This is especially useful in cases where automated schedules may not be suitable.
Setting up Product Keys is a two-step process. First, set up Jobs to run, and then create Product Keys.
By following these steps, you can ensure that your bepoz system is ready for the AFL Grand Final public holiday (or any other days you need), allowing you to manage surcharges seamlessly during this busy period. If you have any questions or need assistance with the setup, don't hesitate to reach out to bepoz Support. Enjoy the game and the holiday!